
Though I'm about to reveal just how truly simple these are to make for yourself,
- Leave a comment telling me what type of cupcakes or what occasion you'd use these toppers for AND what color you'd like!
- Like 6 Bittersweets on Facebook, then leave a comment telling me you did or already do.
- Subscribe to this blog, then leave a comment telling me you did or already do.
- Follow 6 Bittersweets on Twitter, then leave a comment telling me you did or already do including your Twitter name.
- Link to this giveaway on Facebook, then leave a comment telling me including a link to the post.
- Tweet about this giveaway tagging me @6bittersweets, then leave a comment telling me including a link to the post.
- Blog about this giveaway, then leave a comment telling me including a link to the post.
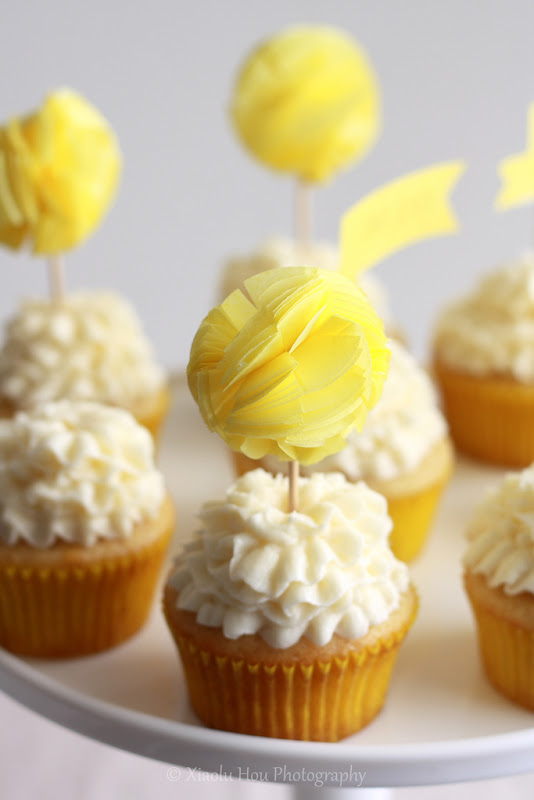
DIY Tissue Paper Pom-pom Cupcake Toppers [Printable Tutorial]
Inspired by Potter & Butler, Method by 6 Bittersweets
XIAOLU'S NOTES: Some types of tissue paper are too thick or waxy, and do not work well with a craft punch. You can still make these toppers with that type of tissue paper. But you will need to cut a 2-inch circle out of thicker paper (such as card stock), trace circle outlines onto that tissue paper, then cut out tissue paper circles manually along those outlines. This will definitely take longer than using the craft punch, but you can speed things up by cutting between 8 and 16 layers of tissue paper at a time.
Tissue paper (any color)
2-inch circle craft punch (such as this one)
Sewing needle
Thread (preferably in similar color to tissue paper)
Scissors
4 to 5-inch lollipop sticks OR wooden skewers cut to size
Double-sided tape
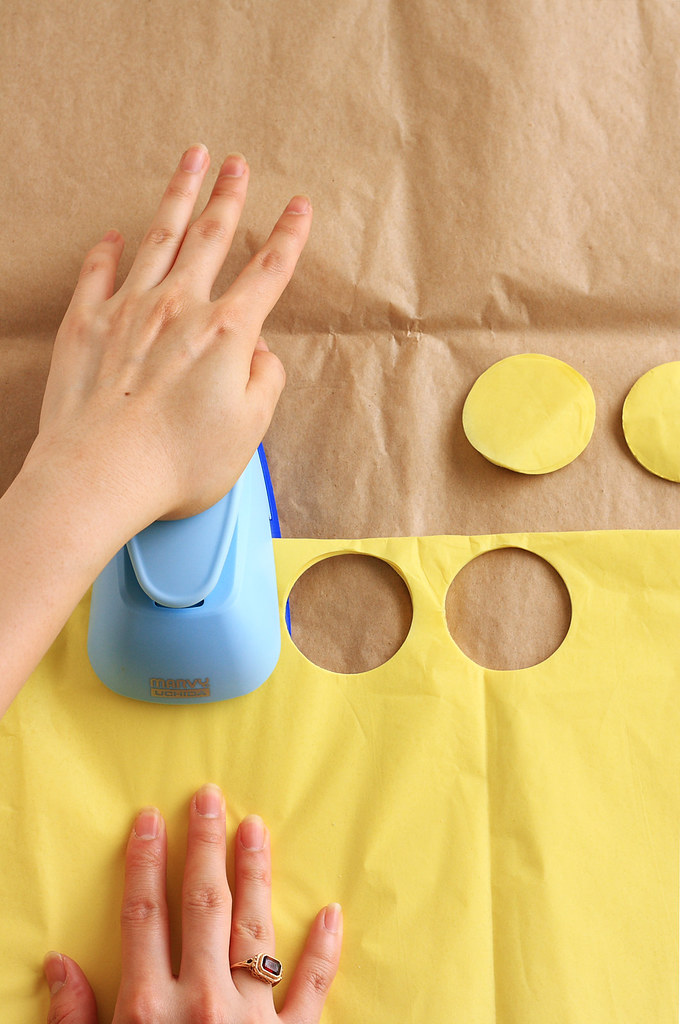
Fold or layer tissue paper so that it is between 8 and 16 layers thick and punch out 2-inch circles using the craft punch. You'll need 30 circles per pom-pom topper. Because it's so thin, the tissue paper easily gets stuck in the punch. After 30 minutes of frustration, I finally figured out the trick: (1) insert the paper into the punch and presh down just far enough that you can no longer shift the paper around freely; (2) continue holding the punch down partially as you use your other hand to pull the tissue paper in the other direction as if you're trying to remove it from the punch (this pulls the paper taut so the punch cuts the tissue paper instead of pulling it inside); (3) continue pulling the paper as you push the punch firmly down all the way and cut out your circles.
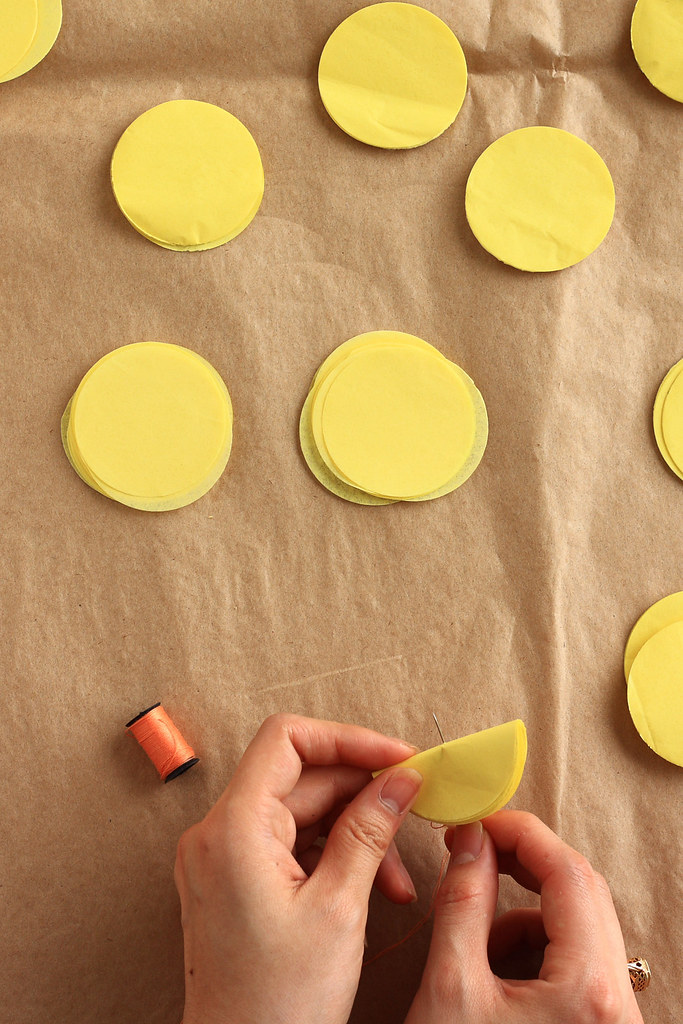
Double-knot the thread on the opposite side as close to the tissue paper as possible and cut the remaining thread close to the knot.

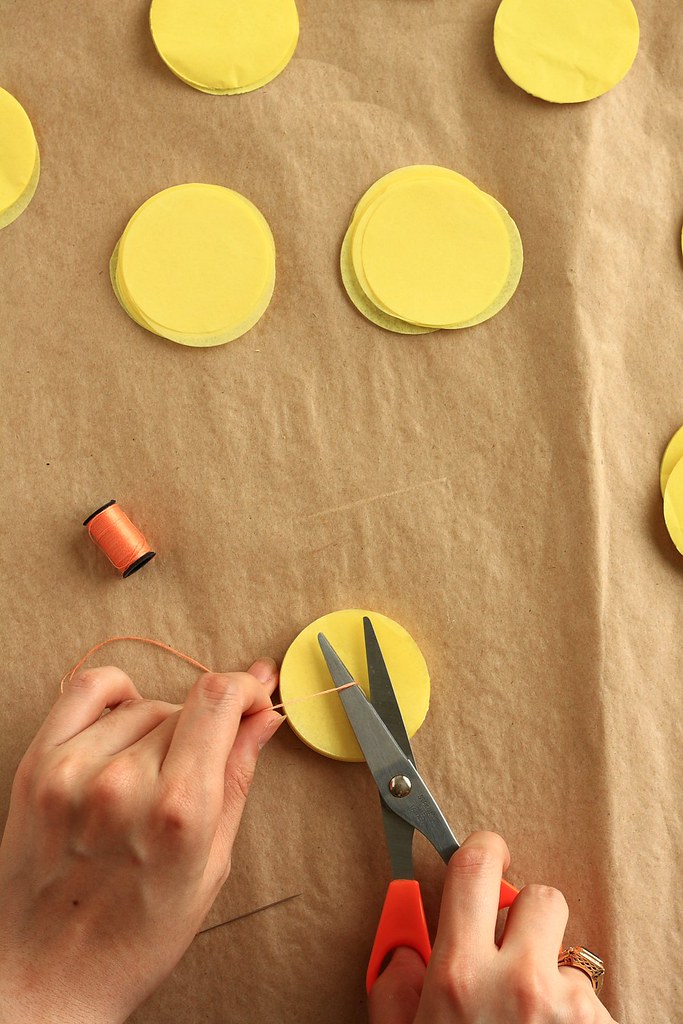
Use scissors to cut 8 evenly spaced "spokes" into the circles, stopping 1/4 inch from the center.
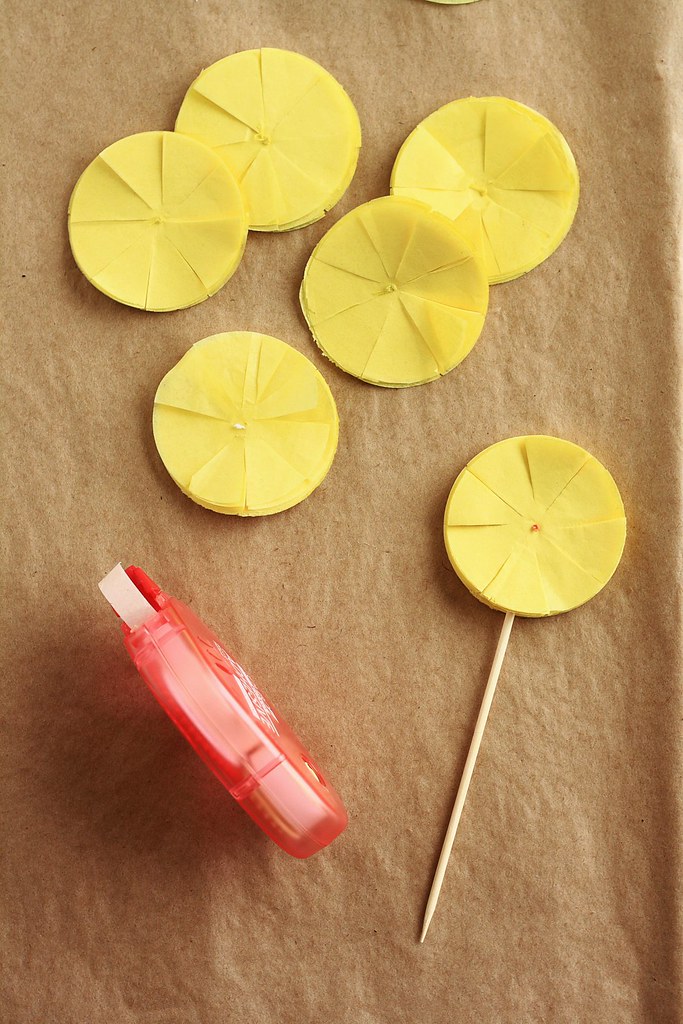
Attach the circles to a 4 to 5-inch paper or wood stick using double-sided tape. First cover 1 inch of the tip of the stick with double-sided tape, then carefully insert the stick about halfway between the layers of circles and toward the center point of the circle. Do not insert the end of the stick beyond the center point or it will be hard to fluff the topper later. Once you've inserted the stick, press the tissue paper on both sides along the tip of the stick to ensure it adheres well.
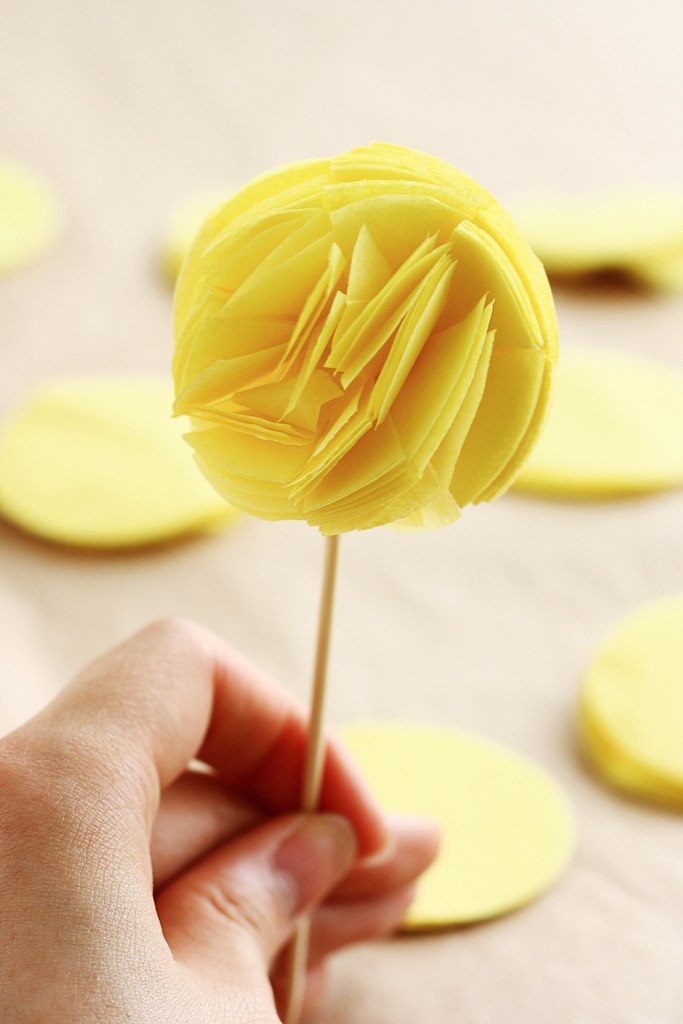
Use your fingers to separate and bend the tissue layers and cut sections until about half the layers have been fluffed out. Now turn the topper over and fluff out the rest of the layers from the other direction until it looks like a pom-pom. You want to be gentle since it's tissue paper, but you will also want to press near the base repeatedly as you fluff in order to crease the paper so that the sections don't fall flat again. Now you can instantly make any cupcake more festive with your new topper =D!
UPDATE: I've filmed a video demonstrating how to fluff up these toppers -- you can watch it HERE on my Youtube channel!
UPDATE: I've filmed a video demonstrating how to fluff up these toppers -- you can watch it HERE on my Youtube channel!


So cute! A pity I cannot take part in the giveaway...
ReplyDeleteCheers,
Rosa
man, I envy your patience and your eye for detail. Pfew
ReplyDeletewow such a cute idea! I love it!
ReplyDeleteI LOVE the pom-pom!
ReplyDeleteI would use them (and make more) for my kids' 5th birthday!
malena@hansentriplets.com
Brilliant. Edible pom poms would be even more interesting.
ReplyDeleteI didn't realise you were married/engaged:) Got distracted, sorry could not help commenting:)
love it!
ReplyDeleteliked you on facebook! too cute!
ReplyDeleteThese are sooooo cute!! I use these for my Godson's 1st birthday party for sure!! If I do win...I would love these in a light blue color!! Thank You!!
ReplyDeleteYaneri
yanerirodriguez@gmail.com
I "LIKE" 6 Bittersweets!!
ReplyDeleteYaneri
yanerirodriguez@gmail.com
i like.. like the cupcakes and the pom-pom...i guess i would love to have them in any color and wid summer approaching i would love to use them on cupcakes for a pool/beach party...would love to see their feathers flutter in the wind:)i can see it's a lot of hard work to get the right pom pom...kudos & cheers to u!!!
ReplyDeletethanks..
Oh my gosh these are so adorable! I was going to ask you where you got them from, but yay! now I can make them myself! ( tho am sure they won't be as neat as yours!)
ReplyDeleteI'm a subscriber through Google Reader!
ReplyDeleteYaneri
yanerirodriguez@gmail.com
Oh, these are super cute and I even shared it on Facebook before realizing there was a giveaway! Cannot wait to make some for my kiddo's end of the school year picnic on Friday. Thanks for sharing!
ReplyDelete~artgirl68@yahoo.com
I love the pom poms they're so cute! I would used them for my daughter's sweet 1st birthday party!
ReplyDeletenaneky@aol.com
I follow you on Twiiter! I twitted about your sweet little giveaway!
ReplyDeleteYaneri
yanerirodriguez@gmail.com
Tweeter name: Nrsegreeneyesrn
http://twitter.com/#!/NrseGreenEyesRN/status/72793597140942848
I'm glad you all like these!
ReplyDeleteThree Cookies - LOL I'm not married OR engaged...why did you think so?
I twitted about your giveway!
ReplyDeletehttp://twitter.com/#!/NrseGreenEyesRN/status/72794809454166017
Yaneri
yanerirodriguez@gmail.com
Such a beautiful cupcake celebration Xialu. You are a pro!
ReplyDeletewhat a cute pop -pom... Nice way to spice up the baked goodies...:)
ReplyDeleteEnjoyed your tutorial Xiaolu...:)
I like this blog on facebook too...:)
ReplyDeleteThese are so sweet! That would be perfect for my sunshiny baby shower in June! In fact, if my sister hadn't forbidden me from sending her anymore ideas, I would send her this right now (I still might).
ReplyDeleteThese are awesome! I had pom poms at our wedding so these are right up my alley. I'd love to use these for some cupcakes for my mom. She loves lime green!
ReplyDeleteI likes you on Facebook. Can't wait to see what else you come up with.
ReplyDeleteI couldn't resist, I just shared this with my sis (all passive-aggressively) via Facebook. And while "liking" 6bittersweets on Facebook, I realized your located in my area! (NOVA) Your pictures make me hungry.
ReplyDeleteAnd now I'm following you on Twitter (OneBlondeGirl).
ReplyDeleteI've seen cupcake toppers literally 'popping up' all over the blogosphere, but not come across a tutorial (I've been too lazy to search around). This is cute, I want to to make some too! :)
ReplyDeleteThanks for sharing how to make these pom poms Xiaolu. They are absolutely adorable, so it's great I can now make my own!
ReplyDeleteThese are so pretty! I would love pink ones and would use them in champagne cupcakes for my Bday next week :D
ReplyDeleteI already like you on FB :)
ReplyDeleteI had bought the ceiling poms for a party from Martha Stewart, and I love them but I'm glad you included the DIY.. spending $20 on toppers that will be thrown away is pricey... DIY makes them much more affordable neh?
ReplyDeleteElle, it does as long as you're not charing yourself by the hour for making them =p
ReplyDeleteI follow u on Twitter.
ReplyDeleteI linked to this giveaway on my FB page!
ReplyDeleteI tweeted about this giveaway. xoxo!
ReplyDeleteOh my my !! Can the cup cakes get any cuter ..... Luv the details. I would luv to have a light mauve one :P Already a fan of yours and following you on FB too ..........
ReplyDeleteEeeeeek!!!! Xiaolu I LOVE THIS! and I like this idea for craft tutorials, I am inspired to make some for my next party :) You're the best those cupcakes were so beautiful!!
ReplyDeleteBeatufiul pom pom! You are so creative and very very good at craft and baking and photography!!
ReplyDeleteOoo, those are gorgeous. Of course I'd love to enter your giveaway. And I follow you on Twitter already :)
ReplyDeleteThese are absolutely adorable. I woulduse them for my friends baby shower
ReplyDeleteAwesome tutorial
ReplyDeleteThank you very much Xiaolu for the tutorial. I definitely want to make this for sure :))
ReplyDeleteJust found you on facebook, and of course I "LIKE" ! Awesome pom pom tutorial!
ReplyDeleteThis is a very cool tutorial. I would use them at my friend's twin girls 2nd birthday party.
ReplyDeleteI found you on facebook today and "like" you
ReplyDeleteLet's see...I think these would make a great mini mousse cake topper, so that's what I'd use it on. OK, my RSS feed thingy doesn't work on my laptop (need a new puter asap), so I'll tweet and twitter :)
ReplyDeleteI follow you on Twitter!! hehe
ReplyDeleteTweeted this giveaway :)
ReplyDeleteI would love to use them for a friend's baby shower. Nice tutorial!
ReplyDeleteI already "like" you on facebook :)!
ReplyDeletethis is soooooooo cool! I love it! and i know this has nothing to do with the post whatsoever, but I really like your ring! is that a giveaway too? ;-) and how do you take a photo of your own hands doing something? wow - teach me how to clone one of my limbs!
ReplyDeleteWhen I saw the cupcakes post, I really did think those toppers looked really cute! You are really very creative and have tons of patience :) I doubt I would be able to sit down and do that! :) Thanks for sharing :)
ReplyDeleteawwww.... love the pom-pom
ReplyDeletegreat pictorial too.. :D
These are so cute and look gorgeous on your cupcakes! My son (turning 3) and my brother (turning 30) are celebrating their birthdays on June 10 (we're going to be in my hometown in NoVa for the occasion and throwing a joint b-day bash). I'd love to use these for the cupcakes I'm making for them. Would probably like the pom poms in a light blue (even though my son claims pink is his favorite color -- I don't think my brother would appreciate that). :)
ReplyDeleteSo cute!! Love this idea.
ReplyDeletei love these little pompoms. thanks for the tutorial dear. and you are still a student?!! i had NO idea!!!
ReplyDeleteI think I use these toppers for chocolate or vanilla cupcakes as a summer treat. I could use them for summer birthdays in my family :).I would pick yellow for summertime!
ReplyDeletebd_657(at)hotmail(dot)com
Whoops I ended up sending the same first message twice previously,sorry.Please remove message 57 from Berendina. lol Silly me.
ReplyDeleteAnyways I'm already a member of your Facebook page 6 Bittersweets under Berendina.D.
bd_657(at)hotmail(dot)com
Already following you on twitter! @TheArtOfBaking
ReplyDeletebd_657(at)hotmail(dot)com
Facebook status about your giveaway!
ReplyDeletehttp://www.facebook.com/permalink.php?story_fbid=117206351698469&id=100001465500636
bd_657(at)hotmail(dot)com
Tweeted!
ReplyDeletehttp://twitter.com/#!/TheArtOfBaking/status/72881101206589440
bd_657(at)hotmail(dot)com
These are such a cute and simpel idea :) Love it....too bad I can't take part in the giveaway :(
ReplyDeleteThese are too cute, and yellow is my favorite color! You are quite the crafty gal my friend! ;)
ReplyDeleteThey look adorable!
ReplyDeleteCongrats on your first tutorial! These pom pom toppers are so pretty and sweet :) thanks for sharing how to make them heh
ReplyDeleteIt's so much fun! I think it suits well on a girly theme party with coordinating big tissue flower as the main decoration. I love picturing them gradating in pale pink to pansy red.
ReplyDeleteLike you on FB!
ReplyDeleteAlso a blog follower!
ReplyDeleteFollowing you on facebook - love love love these pom poms and the tutorial! I might have to make them for our wedding (you know, in my spare time!).
ReplyDeleteThanks for sharing!
oh so absolutelycute. Its a pity I cant take part in the giveaway..
ReplyDeleteGosh. I'd probably use them for birthdays but graduation or any event would work--you could choose the color!!!
ReplyDeleteTFS the tutorial and for a chance to win!
kmassmanATgmailDOTcom
These are insanely adorable and I am so super amazed by your creativity! I think these would be super festive on some pina colada cupcakes! Maybe light pink!
ReplyDeleteThese are so cute! We have a birthday coming up, these would be perfect--in red or blue, please. Fingers crossed!
ReplyDeletefrugalmomof9 (at) yahoo (dot) com
Subscribed. Thanks!
ReplyDeletefrugalmomof9 (at) yahoo (dot) com
'd love to use these pom poms for my daughter's 4th birthday! They'd be cutest in pink or purple of course :)
ReplyDeleteI have a eggless cake recipe I have to use because of allergies and its made with orange juice, and its quite tasty!
i'd love these toppers for my yellow wedding this summer :)
ReplyDeleteone more for good luck: i like you on FB :)
ReplyDeleteI might make a pretty teal color for my husbands birthday in June!
ReplyDeleteI "liked" you on facebook.
ReplyDeleteI posted about you on facebook.
ReplyDeleteI follow your blog.
ReplyDeleteExcellent tutorial and a surprisingly easy topper to create.
ReplyDeleteSo adorable. Will have to bookmark this page. Now I have a little daughter, I'm sure they'll be plenty of cupcake baking in my future! :)
ReplyDeleteThis post has been removed by the author.
ReplyDeleteI would use these cute pom pom toppers on top of red velvet cupcakes for my sister's birthday and the pom poms would either be pink or purple...2 of my sister's favorite colors! :)
ReplyDeletekrileong@gmail.com
I like 6 Bittersweets on Facebook as Kristen L.
ReplyDeletekrileong@gmail.com
Cutest cupcake toppers! Love them.
ReplyDeleteThis is absolutely unique cupcake topper. I also want to try this one in variety of colors.
ReplyDeleteI love these!!!! I would love pink one's for a bridal shower that I am working on. They are so cute and I am sure would be the talk of the party! Thank you for sharing!
ReplyDeleteKupcakegirl@aol.com
I would love these in red or blue for our 4th of July bbq we do every year!
ReplyDeletebeccafilley@hotmail.com
So sweet of you to take out time and teach us how to make these :)
ReplyDeleteeverything i make from this day forward, will have a pompom topper!
ReplyDeleteI would love a deep purple colour to go on top of a simple vanilla cupcake with vanilla buttercream.
ReplyDeletehow pretty,loved your pom pom idea
ReplyDeleteCute! You're going to send Potter & Butler out of business :p
ReplyDeletethe yellow would be perfect for my friend's wedding in june! lovely crafting. :)
ReplyDeleteIt's difficult deciding on a favorite color. I love the yellow, but for a Springy color combination: minty green topper on top of strawberry or orange cupcakes for good times with friends (if it's a celebration, then strawberry daiquiri or Mimosa cupcakes).
ReplyDeleteI also subscribed to the blog using google. Same account, fanya.valentine at gmail.
ReplyDeleteJust found your site today and browsing through recipes. There are some really good ones! Already bookmarked a couple to try.
I liked your blog on Facebook!
ReplyDelete(Will be making those black sesame macaroons as soon as I get my hands on some sesames...)
Ah, if I win, contact me through this email. Thanks and great blog!
ADORE the pom pom :)
ReplyDeleteKaren Gonyea
ktgonyea at gmail.com
This post has been removed by the author.
ReplyDeleteLove this! I'd probably use it for a birthday party! I would like pink, I think :)
ReplyDeleteI already like you on Facebook :)
ReplyDeleteI'm already following you on Twitter :)
ReplyDeleteI tweeted about it as well :) http://twitter.com/#!/NourhanKay
ReplyDeleteThanks for the tutorial/giveaway!
Love these!! Go perfectly for my dAughters 2nd birthday party!! Yellow and all in her lemonade theme!!
ReplyDeleteJillian
Jillianmcovey@gmail.com
Liked on fb too!!!
ReplyDeleteJillian
Jillianmcovey@gmail.com
Great tutorial!
ReplyDeleteThanks for the awesome tutorial for something so cute and creative. I used this tutorial to make pom pom cucpake toppers for my son's 3rd birthday.
ReplyDeleteHere's the link to his party:
http://turtlecraftygirl.blogspot.com/2011/11/rawr-dinosaur-birthday-party.html
--
Tania
www.turtlecraftygirl.blogspot.com/
This is beautiful! Thanks for sharing!
ReplyDeleteLove this idea. Wonderful work! Thanks for the inspiration. Blogged here: http://blog.joyhey.com/2012/01/12/inspiration-diy-cupcake-toppers/
ReplyDeletelove this idea and am trying to make them as we speak, but I can't get them to fluff like yours, can you be a little more specific with how to fluff. Thanks.
ReplyDeleteHi Hannah, thanks for trying these out and I'm sorry they're not fluffing out like the photos. I actually included a pretty detailed decription of the process. Can you possibly give me more detail of how it's not working out for you (even a photo of what yours currently looks like)? That would help me give you additional directions. Thanks!
DeleteAwesome! Love it and will start making some for my sons birthday! We're on a tight budget but I still want his party to be as magical as I can make it be! <3
ReplyDeleteAmazing and simple! I like this idea. I will use in my work. Thank you for inspiration. Gosia http://cupcakelove.pl
ReplyDeleteSo adorable. Thanks for showing us how to make these.
ReplyDeleteSo cute!i love your idea!!I want to do this.
ReplyDelete